
Pests
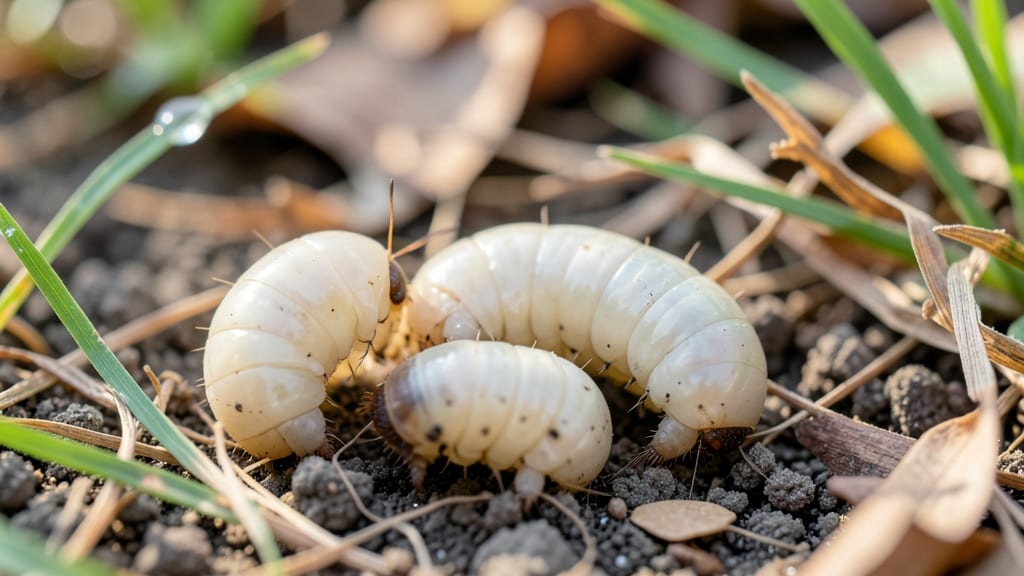
Lawn grubs are the sneaky culprits behind brown patches that won’t grow back no matter how much you water. 🌱 I’ve battled them in my own yard, and the key to stopping them isn’t just treating the damage—it’s creating a barrier they can’t cross.
The right approach turns your lawn into a grub-proof zone without harsh chemicals.
Most people wait until the damage is obvious—yellowing grass, spongy spots, or animals digging up your yard. But by then, the grubs have already done their worst. Instead, focus on prevention: healthy soil, proper watering, and natural predators like birds and toads.
If you do spot grubs, act fast—they multiply quickly, and a single treatment won’t fix a full-blown infestation.
You’ll see results within 2-4 weeks if you time it right (late summer to early fall). The barrier method I use keeps grubs from laying eggs in the first place, so next spring, your lawn stays thick and green. No more guessing what’s wrong—just a simple, repeatable process that works.
Works for any lawn type, from small patches to full yards, and fits into your regular maintenance routine. Let’s get those grubs under control before they ruin your summer.
📚 In This Guide
- What you need
- Instructions
- Tips and common mistakes
- Wrapping up and next steps
What you need
- ● Neem oil (100% cold-pressed): 1–2 cups (for a 1,000 sq. ft. lawn). Look for Azadirachta indica as the active ingredient.
- ● Diatomaceous earth (food-grade): 5–10 lbs. (Apply lightly—too much can harm beneficial insects like bees!)
- ● Hose with a spray nozzle: Adjustable for even coverage (e.g., a cone or fan tip for liquids).
- ● Garden rake or stiff-bristle brush: To gently loosen soil and apply diatomaceous earth evenly.
- ○ Gloves (nitrile or rubber): Protects hands from neem oil and DE (optional but recommended!).
- ○ Watering can (optional): For spot treatments or mixing liquids if needed.
- ● Milky spore powder: A biological control for long-term grub prevention (apply in early spring).
- ● Beneficial nematodes (Heterorhabditis bacteriophora): 1–2 million per 1,000 sq. ft. (best for severe infestations).
- ● Compost or organic mulch: To improve soil health and deter future grub activity.
- ● Lawn aerator (manual or rented): Helps DE and neem oil penetrate deeper into the soil.
Step-by-Step instructions for treating lawn grubs naturally
Here’s the proven method I’ve used to stop grubs before they destroy your lawn—no harsh chemicals needed.
🌱 Step 1: Identify and Confirm Grub Damage
Before treating, confirm you’re dealing with grubs. Look for thin, patchy brown areas that pull up easily like carpet. Run your fingers through the soil—if you find white, C-shaped larvae (½–¾ inch long), that’s your culprit. I check in late summer when grubs are most active, usually after watering when they’re near the surface.
Grubs hide deeper in dry soil, so water the area first. If you see birds (like skunks or crows) digging aggressively, that’s another clue. I’ve found that grubs thrive in lawns with thick thatch or compacted soil—both create perfect hiding spots. Test soil moisture too: grubs love damp conditions, so if your lawn stays soggy, you’ll see more damage.
💧 Step 2: Apply a Natural Nematode Treatment
Use beneficial nematodes (Heterorhabditis bacteriophora), which are microscopic worms that seek out and kill grubs naturally. Mix the nematodes with water (follow package rates—typically 1–2 pounds per 1,000 sq ft) in a spray tank or watering can. Apply in the evening when temperatures are below 85°F and the lawn is moist but not wet.
Water the lawn lightly beforehand to encourage grubs to move up. Then, spray the nematode solution evenly over the affected area. I like to use a hose-end sprayer for large lawns—it covers ground faster. Avoid treating on windy days or when rain is forecast within 24 hours, as nematodes need time to establish before drying out.
☀️ Step 3: Create a Diatomaceous Earth Barrier
After nematodes take effect (7–14 days), reinforce with food-grade diatomaceous earth (DE). Sprinkle a thin layer (¼ inch) over the treated area, focusing on high-risk spots like lawn edges or shady patches where grubs gather. The DE creates a physical barrier that dehydrates grubs on contact—just be sure to reapply after rain or watering.
I use a broadcast spreader for even coverage. Avoid overapplying—too much DE can harm beneficial soil organisms. Water lightly after application to help the DE settle into the grass blades. You’ll see results within 2–3 weeks if grubs were present, but consistency is key. Reapply DE every 4–6 weeks during grub season (late summer to early fall).
✂️ Step 4: Overseed and Strengthen the Lawn
Grubs weaken grass roots, so reseed bare patches with grub-resistant grass seed (like tall fescue or Kentucky bluegrass). Rake the area lightly to loosen soil, then spread seed evenly. Cover with a thin layer of compost (¼ inch) to protect seeds and retain moisture. Water gently daily until germination (7–14 days), then reduce to 1 inch per week.
I also aerate compacted soil to improve root growth—grubs love dense turf. Use a core aerator in late summer to let oxygen and water reach roots. Fertilize lightly with a low-nitrogen, high-phosphorus blend to encourage strong root development, which makes grass more resilient to future grub attacks.
🪴 Step 5: Monitor and Maintain Long-Term Defense
Check the lawn monthly for new grub activity, especially after rain. If you spot fresh damage, repeat the nematode treatment in 4–6 weeks. I keep a log of treatments and weather patterns—grubs peak after heavy summer rains, so I plan nematode applications around forecasted downpours.
Encourage natural predators like birds, toads, and ground beetles by leaving leaf litter in garden edges and avoiding broad-spectrum pesticides. A healthy lawn with diverse soil life is the best grub deterrent. If grubs return yearly, consider a preventive nematode application in early summer before they become a problem.
Tips & tricks for natural lawn grub control
These practical strategies will help you get the most out of your natural grub treatment—saving time, money, and frustration along the way.
Timing is Everything: In Step 2, when applying nematodes, aim for late evening when temperatures drop below 85°F—this gives them the best chance to survive and multiply. I've found that applying after a light watering (but not soaking) encourages grubs to move up toward the surface where nematodes can find them. The 24-hour rain-free window is critical, so check your weather forecast before treating.
Visual Cues for Grub Identification: In Step 1, don't rely solely on brown patches—dig up a small section of turf to check for those telltale white, C-shaped larvae. I like to look after watering when grubs are near the surface. If you're unsure, bring a sample to your local extension office—they can confirm if you're dealing with grubs or other pests. This saves you from treating the wrong problem!
Equipment Upgrade: For Step 3, invest in a broadcast spreader if you don't have one—it makes applying diatomaceous earth much more even than trying to sprinkle by hand. I've tried both methods, and the spreader covers large areas in minutes. Just remember to calibrate it first to ensure you're only applying that ¼-inch layer. Too much DE can actually harm beneficial soil organisms.
Seasonal Strategy: Plan your treatments around your local grub season, which typically runs from late summer through early fall. I mark my calendar to apply nematodes every 4-6 weeks during this period. For long-term prevention, consider an early summer application before grubs become established—this is when I've seen the most dramatic improvements in lawn health.
Pro Tips for Treat Lawn Grubs
- These practical strategies will help you get the most out of your natural grub treatment—saving time, money, and frus...
- Timing is Everything: In Step 2, when applying nematodes, aim for late evening when temperatures drop below 85°F—this...
- Visual Cues for Grub Identification: In Step 1, don't rely solely on brown patches—dig up a small section of turf to ...
Frequently asked questions
When is the best time to treat lawn grubs?
The ideal time to treat lawn grubs is in late summer to early fall (August–September) when they’re young and most vulnerable. Early spring (April–May) is also effective if you missed the first window. Avoid treating during extreme heat or drought, as stressed grubs may already be causing damage.
Are chemical treatments safe for pets and kids?
Most chemical grub treatments (like imidacloprid or chlorantraniliprole) require a 24–48 hour wait before allowing pets or kids back on the lawn. Opt for natural alternatives (neem oil, milky spore, or beneficial nematodes) if you have young children or pets. Always follow label instructions for safety.
How much does grub treatment cost?
Costs vary by method:
- Chemical treatments: $10–$30 per 1,000 sq. ft. (DIY) or $50–$150+ per treatment (professional).
- Natural solutions: $10–$50 for nematodes/neem oil (covers ~5,000 sq. ft.).
- Milky spore: One-time $20–$40 (long-term prevention).
How do I confirm grubs are the problem?
Dig up a 2–3 inch square of sod—if you see white, C-shaped larvae (grubs) in the roots, that’s your culprit! Other signs: spongy lawn, wilting grass, or animals digging. Rule out other pests (chinch bugs, ants) by checking for tiny black bugs or mounds.
Will treating grubs fix a dead lawn?
Not always! If grubs have already killed large patches, you’ll need to reseed or sod those areas after treatment. Healthy turf helps prevent future infestations, so pair grub control with proper watering, mowing, and fertilization for best results.
How long until I see results?
Chemical treatments show results in 1–2 weeks, while natural methods (nematodes, milky spore) may take 4–6 weeks to fully work. Monitor for reduced digging by animals or firmer grass as a sign of success. Repeat treatments annually if grubs return.
Wrapping up and next steps
Dealing with lawn grubs doesn’t have to be a stressful battle—with the right natural barriers and proactive care, you can protect your lawn and keep those pesky pests at bay. 🌱 Remember, consistency is key: monitor your lawn regularly, maintain healthy grass, and act fast if you spot signs of trouble.
By following these steps, you’ll not only save your yard but also enjoy a lush, thriving green space for seasons to come!
Ready to take action? Start today—grab your supplies, roll up your sleeves, and give your lawn the defense it deserves! 💪 Your future self (and your grass) will thank you!